
Sonic Retro user Morph and several others have gone through Sonic Adventure DX and created a mod that restores the lighting effects that were previously seen in the original Sonic Adventure into the PC version. The difference gives off more vibrant colors in the environment that also reacts to objects and characters. You can download the mod from the discussion thread in our forums.
Lighting can be used to set a specific tone or mood in an environment. But why is it such a difficult thing to remain consistent when converting this to other game platforms? The game featured an artistic shift that occurred when the game was converted to other platforms. A combination of technical hurdles and creative liberties can dampen the original artistic intent, and Sonic Adventure is no exception. The original Dreamcast version featured a “Lantern” engine which provided impressive looking lighting effects using palettes on SEGA’s then cutting edge game console. However the dozens of ports of the game left out these lighting effects in favor of using drop shadows instead, until now. Check out additional videos, comparison screenshots and an interview with Morph on the mod after the jump!
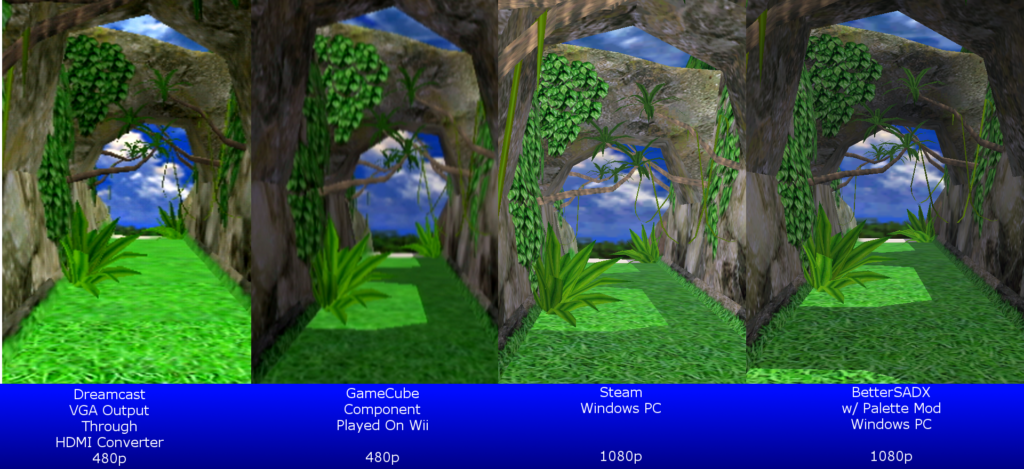
After the original Dreamcast version, the lighting effect was replaced with drop shadows on the GameCube. The GameCube port ran at 60 frames per second, but with some random bursts of slowdown and frame stuttering. The developers also chose to remodel characters and change the textures that feature muted colors and shinier characters. Later PC ports retained the same graphical changes at the expense of changing the nuance throughout the scenery despite using potentially stronger hardware. Notice the rock alcove in the screenshot above. You can see the lantern lighting effects in the Dreamcast version give more definition to the structure. The palette mod makes it possible to combine both drop shadows and lantern light sources at the same time.
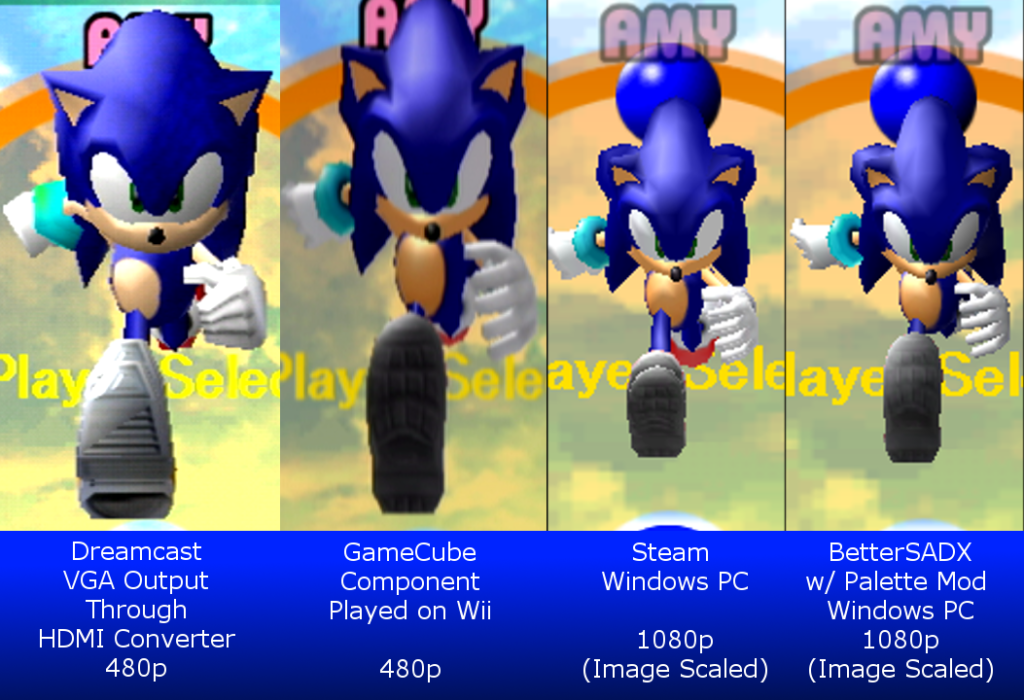
The lantern engine also affects how characters are rendered. Aside from the texture and model changes, characters give off a more rubbery, shiny look to them while other colors appear more flat. With the lantern lighting system, the vaseline effect appears reduced as seen in the character select screen. The lantern engine’s rendering technique shown across Sonic’s eyes gives a better illusion of a light source on both Dreamcast and in the palette mod.
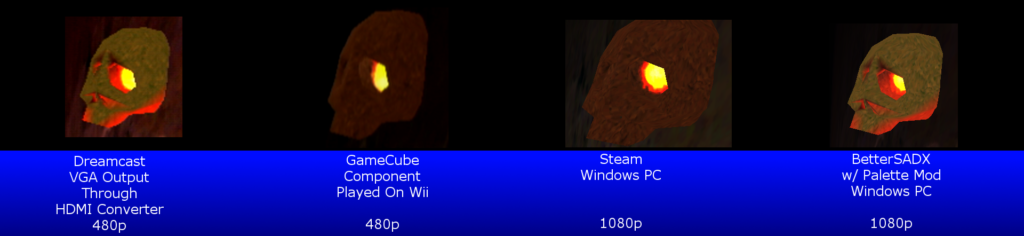
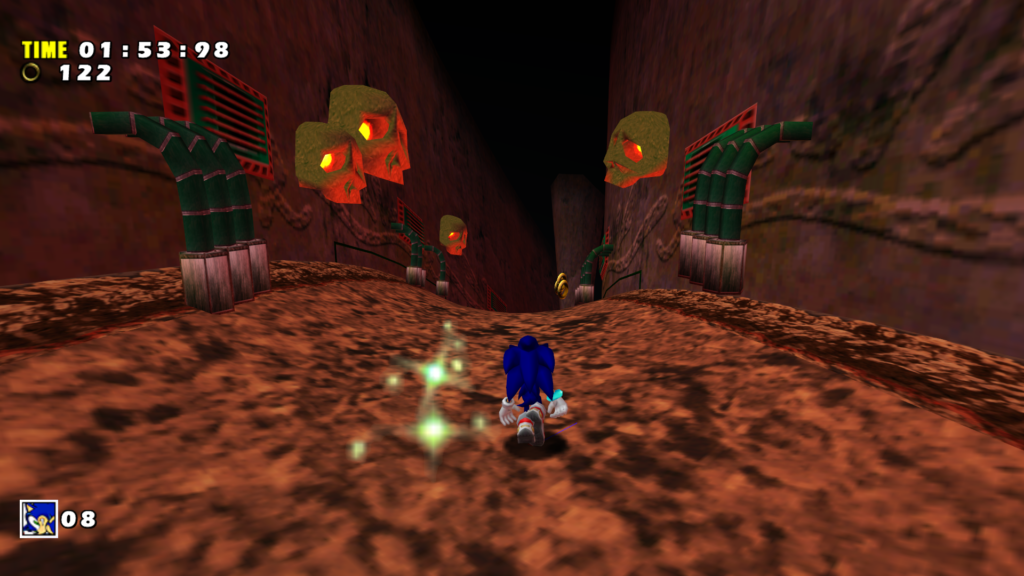
A more obvious example comes in Red Mountain Part 2. Here the lantern light sources give a lighting ambiance with the flames inside the skulls decorated in the caverns. In comparison the DX version doesn’t really bother with any kind of ambient lighting effects hiding the detail of the skull due to the texture used and looks rather primitive as a result. The palette mod comes pretty close to the Dreamcast version with the ability to render at a higher video resolution.
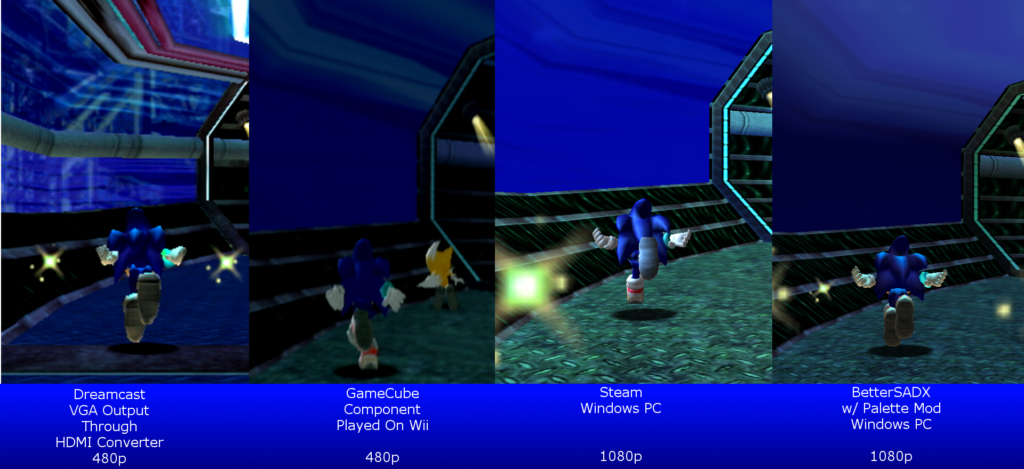
Finally lets take a look at Final Egg Part 2. Aside from the texture changes, the DX version faces a change of tone in the environment and on Sonic (and Tails!) as light seems to not exist on the GameCube version, and just pumps up the shine in the Steam version having light pointed at Sonic coming from seemingly nowhere. In the palette mod, the restored lantern engine matches and in some cases even surpasses the detail seen in the Dreamcast version thanks to Sonic’s higher polygonal count showing light bouncing off of his quills and hands.
If you’re tempted to try the mod out yourself, you can obtain it from the discussion thread on Sonic Retro. This will work on the PC version released in 2004 or by installing the Better SADX mod designed for the Steam release. You can also check out the dedicated Dreamcast hacking and conversion thread for Sonic Adventure DX which allows you to restore the Dreamcast experience even further by restoring the original textures and UI, or you can go hog wild in the general hacking thread and go for the even crazier changes including the addition of Super Sonic to normal gameplay among other features made possible by the talented hacking community. I also fired off some technical questions over at Morph to give a more detailed look on the conversion process of the lighting mod which you can read below.
If you want more help installing the mods or want to look at more comparisons, BlazeHedgehog has also created a handy video that also provides a tutorial on his YouTube channel. If you want to see levels compared in further detail, check out YouTube user ZoядkдяoZ’s channel, who I totally didn’t just copy and paste into this article, in his dedicated playlist.
From the Forums
- Discussion Thread (Download Here)
- Dreamcast Mods for Sonic Adventure DX Thread
- General Sonic Adventure Hacking Thread
Screenshots
Videos
Interview
Retro: What were you able to take from the Dreamcast original to work on this mod?
Morph: Literally speaking, the color palettes themselves. If you take a look inside the mod’s system folder, all those .bin files hold the lighting information. Depending on your archive extractor of choice, they should all still have their original last modified dates of 1999-2000.
Retro: Why were later ports of Sonic Adventure on GameCube and PC lacking these lighting effects?
Morph: The SADX Preview prototype for the GameCube still had this system in place, and it appeared to be working (mostly) fine, so I can only imagine it was a design choice. If not, it could have been due to performance, but that’s unlikely given how simple the effect is. I’m no graphics pro though, so I of course could be wrong.
Retro: Who helped contribute to the mod?
Morph: PkR and ItsEasyActually both played big roles in understanding the palette format. PkR in particular frequently checked the accuracy of my implementation against the original Dreamcast version, which was a great help. I did the programming, though. That being said, it’s an open source project, so anyone with the know-how who’s willing to contribute is of course welcome to!
Retro: What were the changes made to the lighting system to reinstate the lighting?
Morph: Does totally disabling it count? I basically had to inject code wherever changes are made to the lighting so I can see what it’s trying to do, and then I forward that information to my shader instead which does all of the actual lighting work. The only typical lighting calculation that occurs in the shader, however, is per-vertex brightness. It uses this brightness to select a color from the specified palettes, and outputs that to the rasterizer as the vertex color. For those unfamiliar with vertex color, a good example is Spyro the Dragon. It uses vertex colors for distant geometry so they could just skip the texturing phase entirely. On the PS1, that’s sure to improve performance. They did a lot of cool stuff with all three of those games!
Retro: Why is the lighting mod resource intensive?
Morph: It’s partially due to my own inexperience with using a shader, and partially because of the way I have to inject code to enable the use of the shader at all. The way I designed it (using the Microsoft Effect system) allows it to basically generate several shaders (called Techniques) based on a few parameters. As it is now, the shader has a technique for your regular run of the mill lighting, one for no lighting, one for no fog, and one for both no fog and no lighting. This plays into why it’s so intensive.
If I had more control over the rendering pipeline, those separate techniques would be welcome optimizations rather than performance hindrances. The idea behind them is to reduce load on the GPU. Ideally, the models in the scene would be grouped by desired shader technique and rendered in bulk. If I were to perform those checks in the shader (Is lighting enabled? Is fog enabled?), those checks would be happening for every single vertex of every single model rendered, and potentially every single pixel rendered to the screen.
But unfortunately, I have to switch between them multiple times (understatement of the year) per rendered frame to accommodate the needs of the models being rendered. The bottleneck here is the CPU–or more accurately, DirectX, which is not designed for such frequent shader technique switching. So of course if you have a fast CPU, it can get that operation over with faster; hence the CPU bottleneck.
The game has a render queue built in (used by default to sort transparent objects so you can actually see through them) that I’m working to understand and perhaps take advantage of. If I manage it, I can queue up all models to be rendered and sort them by required shader technique which would reduce the number of shader switches from potentially hundreds per frame to about 8 tops.
For the time being though, I’m going to experiment with doing this the inefficient GPU way: check flags every vertex and/or pixel. It could be that the GPU performance tradeoff for doing it that way would be enough of a CPU performance boost that it will run silky smooth all the time.
Retro: Did you have to make any major changes to the levels, characters or objects to reinstate the original lighting?
Morph: Nope! I designed this using mostly vanilla DX assets, just because I hadn’t bothered to download PkR’s wonderful Dreamcast level ports for a long while.
Retro: This mod requires a later revision of the Direct X library to reinstate the lighting effects. What does Direct X 9 offer over DirectX 8?
Morph: More advanced (which isn’t saying much, mind you!) shader capabilities. I had originally attempted to implement this in vanilla DirectX 8, but the shader had to be written in assembly. Basic features required special instructions which would break the rest of the instructions after it, it would fail to compile the shader with seemingly useless errors, etc etc. With DirectX 9, I was able to write the shader using HLSL, which uses C/C++ style syntax. It gives much more useful error messages and was much easier to prototype changes since it’s overall easier to understand.
As far as the game knows though, it’s still using DirectX 8. Thanks to Windows’ DLL shenanigans, I was able to use a shim called d3d8to9 which forwards all D3D8 calls to D3D9 render calls and vice versa. This otherwise wouldn’t have been possible without tearing the game apart (even more so than it has been) to replace the renderer manually. I even helped fix bugs to ensure it was SADX-compatible.
Retro: What are the future plans for the mod?
Morph: I’d like to implement an ingame palette editor/visualizer. Maybe integration into SA Tools since it’s vital for lighting on the Dreamcast. As a long-term goal, I might try to make the code more generic so it can be used as a platform to implement arbitrary shaders.
Retro: Any other thoughts on the project?
Morph: Hm… Maybe how it managed to get this far? I thought the reason SADX looked so much worse lighting-wise was because it had poorly configured lights. It wasn’t until PkR started poking at the files that I realized it allowed for arbitrary color gradients. My first thought was that it was some form of texture overlay (as not much testing had been done in the original SA1 at this point), so that’s how I tried to implement it. Getting it to look right was mostly trial and error until one day I had an epiphany. I realized it must be using the brightness of the vertex to determine which color to select from the palette (which by the way, is determined by calculating the dot product of the vertex normal and inverse light direction). I went ahead and wrote some code to do that, and it was comparatively speaking shockingly close to how it should look.
From there, it was a matter of determining which palette was applied where, how, and why. It was confusing, because each palette was oriented in pairs. Eventually after some experimentation, we (PkR, ItsEasyActually and I) determined that the first color in each pair was the diffuse color with baked ambient color, and the second color in each pair was used for specular lighting. Aside from some precision issues and overall polish, we had achieved the winning formula.
Pretty much a tl;dr of the last 6 months or so for me, lol. It was a great learning experience; I’m now much more familiar with a lot of the inner-workings of SADX due to the reverse engineering it required. Plus, now I know HLSL.
10 Comments
Now we just need the DC models.
Not me. Why would I want to downgrade to the lower poly DC models?
Because the new ones look out of place next to the world map / Robotnik / NPCs. Like a bad mod.
Apart from nostalgia, some people prefer the older models for aesthetic reasons. SA1 models have a distinct look, they were the first “modern” character models in a 3D Sonic game. SADX models look more like SA2. I’m not a big fan of SA2 and I feel like those models don’t belong in this game. Also, the updated models look awkward next to the other models that didn’t get updated. Look at Sonic’s model and compare it with the echidnas in Mystic Ruins Past, or people in Station Square.
Perhaps update the human models (and froggy)
Well, first the DC models actually look pretty good still, second, the new models aren’t as crisp as the DC ones, not to mention now we basicaly have a better fancyer version of the original DC title.
love your videos
Sounds like a nice mod. I personally enjoyed this game on the Dreamcast when it was new, but at this point I don’t find much interests in replaying it. I actually dislike how this game has you running through a hub would talking to humans that didn’t belong in the game in the first place. Still to each there own.
That has to be one of the dumbest criticisms I’ve read.
it doesn’t work.